Friday, June 2, 2017

Setting Up Screen Saver In Windows 7

Setting a screen saver or animated pictures that appears on your screen when the mouse and keyboard have been inactive for a period of time, prevents from seeing your Desktop. When you move your mouse or press a key on your keyboard, the screen saver turn off and display your Desktop. Windows 7 comes with several screen savers pre-installed. You can also create your own personalized slide show screen saver featuring images in your Pictures folder.

To enable Screen Saver follow the steps:

1. Open the Control Panel, click Appearanceand select Display.

2. Click Change Screen saver from left side of the display window to display Screen Saver Settings dialog box. 


3. The Screen Saver Settings dialog box opens. Choose the screen saver you want to use from the Screen saver drop-down menu.


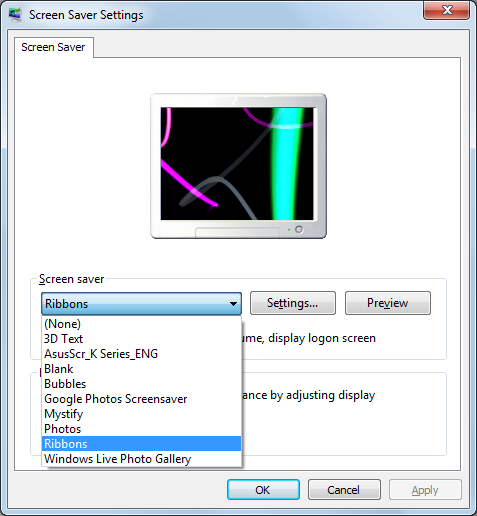
4. Some screen savers have settings you can change. For example, the 3D Text screen saver enables you to specify what text should be displayed, the font, how the text rotates, and more. To access these settings, select the desired screen saver in the drop-down list and press the Settings button.


5. Use the Wait text field to specify how long your system should be idle before the screen saver starts.


6. If you want Windows 7 to require a password to redisplay the Desktop, click the on resume, display logon screencheckbox to select it.


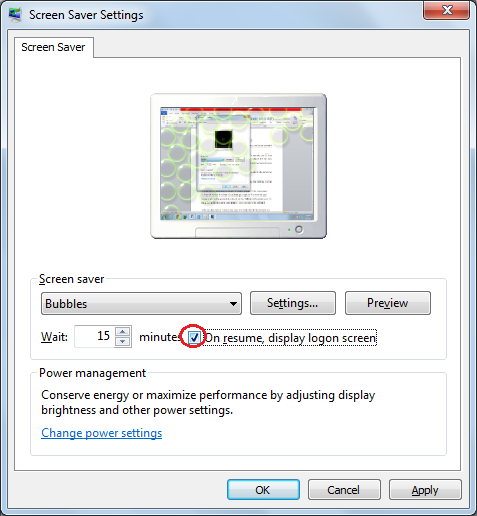
7. Click the Preview button. Windows 7 displays a preview of the screen saver.

8. Click OK to close the Screen Saver Settings dialog box. Windows 7 will launch the screen saver when next time your system is idle for the specified duration. 

Create a custom screen saver 

You can also create a custom screen saver that cycle through the photos in your Pictures folder. To do so, follow these steps.

1. Open the Control Panel, click Appearanceand select Display.

2. Click Change Screen saver from left side of the display window to display Screen Saver Settings dialog box.

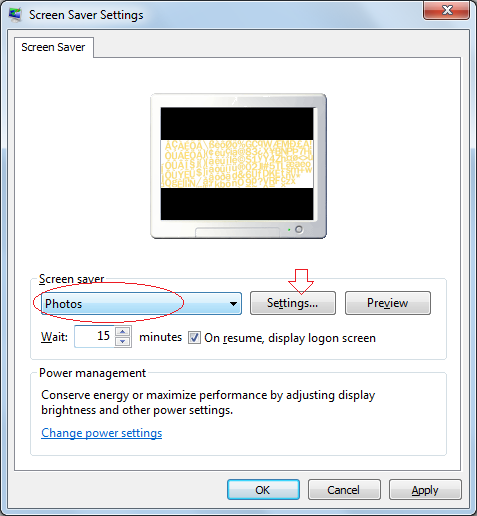
3. In the Screen Saver Settings dialog box, choose Photos from the Screen Saver drop-down menu and click setting.


4. By default, Windows 7 cycles through the photos in your Pictures folder. To use photos in a different folder, press Browse in the Photos Screen Saver Settings dialog box. Then, in the Browse for Folder dialog box that appears, locate and select the folder that contains the images you want to use, and then press OK.

5. The Photos Screen Saver Settings dialog box opens. To change how quickly Windows 7 cycles through your photos, choose a different speed from the Slide show speed drop-down menu.


6. If you want Windows 7 to shuffle the photos in the slide show, click the Shuffle Pictures checkbox to select it.

7. Press Save to close the Photos Screen Saver Settings dialog box and Press OK to close the Screen Saver Settings dialog box.

8. When next time your system is idle for the specified duration, Windows 7 will launch the screen saver. To return to the Desktop, move your mouse or press any key on the keyboard.

HOW TO WATCH TV ON VLC MEDIA PLAYER

Tokeo la picha la vlc with tv

Today I will teach you how to watch tv on vlc media player And I know that you heard about it
but Today you will know how to do it And you sometimes want to watch football game but you don't have tv but you have a pc so Today will know it
Let's us start it
Step Numbe 1
Open your browser and type www.ptvsatlinks.blogspot.com

Step Number 2
Just click tittel number 1

Step Number 3
Choose link of tv what you like and copy

Step Number 4
Just open your vlc and click media

Step Number 5
open network steam

Step number 6
just pest link in box and play

Step number 7
you will see like this there are no minutes on vlc

Thank you so much for read this lesson so if you have a something just comment and share it 
for your friends every one wants to know it like you and you have to do it

How To Hide File Inside Picture?


Have you ever wanted to hide your important files or document inside an image file on your computer? You can hide any type of file inside of an image file, including txt, exe, mp3, mp4 or whatever you wish. Not only that, you can also store many files inside of single image.

1. Select an image to be used for hiding file behind the image.

2. Select a file you want to hide and make it in .RAR format with the help of the WinRAR and Name it whatever you want.

3. Now paste both the files on your desktop. You can do this anywhere instead of desktop.


4. Click the Start button, choose Run, type cmd in the Run text box and then press enter to open the command prompt.

5. Then type CD Desktop to change your directory to desktop.


6. Now type the following line and press Enter.

Copy /b imagename.jpg + filename.rar finalimagename.jpg


Here Imagename.jpg is the name of the image you're using, filename .rar is the name of your file, and finalimagename.jpg is the name of the new image with the hidden file within it.

7. Now when you will try to open this newly created image it will open as a normal image.


How to Access Hidden File?

You can access your hidden file in two ways. Firstly, simply change the extension to .RAR and open the file using WinRAR. Secondly, you can just right-click on the JPG image and choose Open With WinRAR and extract the file

HOW TO BLOCK SOMEONE ON INSTAGRAM

Image result for instagram

INSTAGRAM Is an enjoyable social network and many people are using it. They enjoy the features they find in it and also the communication between one person to another as in comments, likes or shares. But there are also people who like to disturb others by commenting abusive words or stupid things just to make the other person look bad or humiliated. So for those kinda people we have the best solution which is by blocking them,where they wont be able to comment or do anything to your account or posts. And here is how to do so,

Step 1;
Open your Instagram in your phone and go to favorites and write a name of the person you want to block,


Step 2;
Click on  the persons account,


Step 3;
Click on the menu on the upper right side,


Step 4;
Then click on "Block" to block the person,


Step 5;
You will be asked to confirm if you are sure, just click on yes,


Then you will find to be no more bothered by this person.